
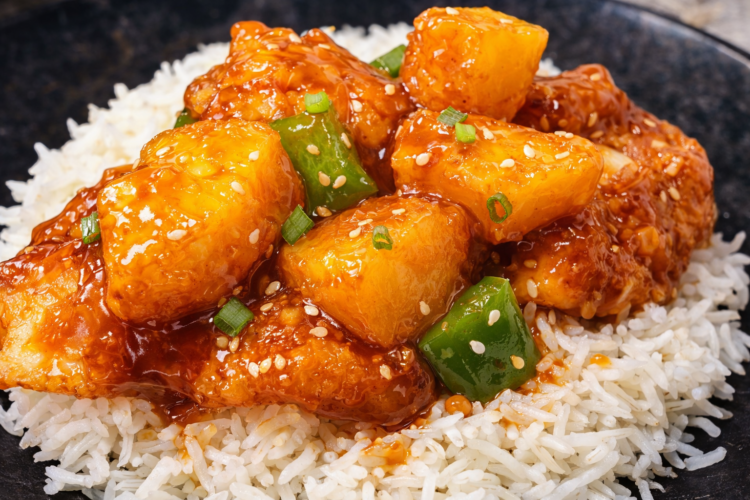
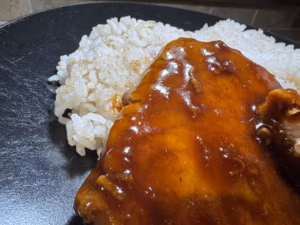
This easy sweet-and-sour chicken is everything you want from a takeout-style dinner, made right at home. Crispy chicken pieces are tossed in a glossy pineapple-forward sauce that’s tangy, lightly sweet, and deeply comforting—perfect over a bowl of fluffy white rice. It’s a simple sweet-and-sour chicken recipe that feels nostalgic, cozy, and just grown-up enough to feel like a reward at the end of a long day. If you’re craving Chinese sweet-and-sour chicken without placing an order, this homemade version delivers.
Why I Made This Sweet-and-Sour Chicken

This sweet-and-sour chicken recipe came out of one of those evenings where I needed dinner to work—emotionally, logistically, spiritually… all of it. The kind of night where the day has already taken enough from you, and the only thing left in the tank is muscle memory and hope.
I had rice going, a pot on the stove, and that very specific craving for something crunchy, glossy, and comforting. Not fussy. Not experimental. Just familiar. The kind of takeout-style sweet-and-sour chicken you order when you want guaranteed satisfaction and zero surprises.
In my head, this was going to be a slam-dunk family dinner. Pineapple? Sweet sauce? Crispy chicken? Rice? I was convinced this would be a kid-friendly sweet-and-sour chicken moment.
It was not.
Somewhere between the tang of the sauce and the confidence with which I plated it, my toddler decided this meal was suspicious. The chicken was ignored. The rice was judged. And instead, she quietly staged a rebellion—pulling out a stash of Cheez-Its she’d apparently hidden like an emergency ration, then casually raiding the fruit bowl all evening.
Meanwhile, the adults? We were thrilled. This homemade sweet-and-sour chicken was everything we wanted: crispy, saucy, balanced, and deeply satisfying. And honestly, I’ll take that win.
Why You’ll Love This Sweet-and-Sour Chicken
This is the kind of easy sweet-and-sour chicken that fits into real life. It’s crunchy without being greasy, saucy without being heavy, and bold without crossing into overwhelming. The pineapple brings brightness, the sauce hits that classic sweet-tangy balance, and the chicken stays juicy thanks to using thighs instead of breast meat.
It scratches the takeout itch while still feeling homemade and intentional. Whether you’re feeding yourself, other adults, or a mixed household with unpredictable tiny critics, this dish earns its place in the rotation.
Ingredients You’ll Need
For the Chicken
- Boneless, skinless chicken thighs
- Eggs
- Cornstarch
- All-purpose flour
- Salt
- Black pepper
- Garlic powder
- Oil for shallow frying (vegetable or canola)
For the Sweet-and-Sour Sauce
- Pineapple juice
- Soy sauce
- Apple cider vinegar
- Ketchup
- Brown sugar
- Garlic, minced or grated
- Red pepper flakes (optional)
- Cornstarch
- Water
Veggies & Extras
- Red bell pepper
- Green bell pepper
- Yellow onion
- Pineapple chunks
How to Make Sweet-and-Sour Chicken
Time needed: 50 minutes
- Prep the Chicken
Cut the boneless, skinless chicken thighs into bite-sized pieces. Season generously with salt, black pepper, and garlic powder.
- Bread the Chicken
In one bowl, beat the eggs. In a second bowl, mix the flour and cornstarch. Dip each piece of chicken into the egg, then dredge in the flour mixture until well coated.
- Fry Until Crispy
Heat about ¼ inch of oil in a skillet over medium-high heat. Fry the chicken in batches until golden brown and crisp on all sides. Transfer to a paper towel-lined plate.
- Build the Sauce
In a saucepan or skillet, whisk together pineapple juice, soy sauce, apple cider vinegar, ketchup, brown sugar, garlic, and red pepper flakes. Bring to a gentle simmer.
- Thicken the Sauce
Mix cornstarch and water to create a slurry. Stir it into the sauce and cook for 2–3 minutes, until thick, glossy, and smooth.
- Add Veggies & Pineapple
Stir in the bell peppers, onion, and pineapple chunks. Cook just until the vegetables are tender but still vibrant.
- Toss & Finish
Add the crispy chicken to the sauce and gently toss until fully coated. Let everything simmer together for a minute or two to bring it all together.
Other Takeout-Style Dinners You Might Love
If this homemade sweet-and-sour chicken scratched that takeout itch, there are plenty of other easy, comfort-forward dinners on the site that do the same thing—bold flavor, minimal effort, and no waiting on delivery. These are the kinds of meals that feel fun and familiar, but still work for real weeknights.
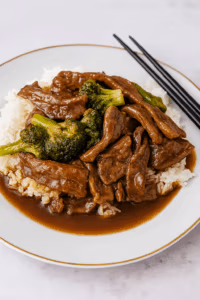
For classic takeout vibes, my shrimp and broccoli stir fry is a must. It’s fast, saucy, and hits that familiar Chinese takeout note that pairs perfectly with rice. If you’re craving something crispy and a little indulgent, crispy bang bang shrimp brings big flavor with that sweet-heat sauce everyone loves. It’s great for dinner, but also doubles as a fun weekend treat.
And because not all takeout cravings are Asian-inspired, let’s talk comfort food. My pizza pasta dinner exists purely in honor of pizza—because sometimes you want cheesy, saucy, carb-heavy comfort without committing to delivery. It’s cozy, family-friendly, and endlessly satisfying.
If you’re feeding kids or juggling mixed tastes, my five easy kid-friendly dinner ideas and five easy chicken dinner ideas posts are lifesavers. They’re packed with realistic, repeatable meals that take the stress out of weeknights. And yes, my easy baked teriyaki salmon absolutely counts as takeout-style in spirit—it’s quick, flavorful, and feels like something you’d order in, minus the price tag.
All of these recipes are about keeping dinner simple, satisfying, and doable—no takeout menu required.
Frequently Asked Questions
Sweet-and-sour chicken is a classic Chinese-inspired dish made with crispy fried chicken tossed in a glossy sauce that balances sweetness and acidity. This homemade sweet-and-sour chicken uses pineapple juice, vinegar, and ketchup to recreate that familiar takeout-style flavor at home, making it both comforting and approachable.
Yes. This is an easy sweet-and-sour chicken recipe that’s very beginner-friendly. The steps are straightforward, the ingredients are familiar, and there’s plenty of flexibility to adjust the sauce to your taste. It’s a great option if you’re new to cooking Chinese sweet-and-sour chicken at home.
The lightly battered, fried chicken and the thick, glossy sauce are what give this dish that restaurant-style sweet-and-sour chicken feel. Using pineapple juice and ketchup creates the signature flavor found in many Chinese takeout versions, while frying the chicken separately keeps it crisp before tossing.
Flavor-wise, this is a very kid-friendly sweet-and-sour chicken. The sauce is sweet, mild, and not spicy. However, some kids are more sensitive to tangy flavors, so you can easily reduce the vinegar or add a touch more brown sugar if needed.
You can bake or air-fry the chicken, but frying gives the most authentic texture for a simple sweet-and-sour chicken. If baking, use a high temperature and flip halfway through for even browning.
This easy pineapple and chicken dinner is best served over steamed white rice, but it also works well with fried rice, lo mein, or simple sautéed vegetables for a complete meal.
Storage, Make-Ahead, and Reheating
How to Store Sweet-and-Sour Chicken
If you have leftovers, this sweet-and-sour chicken stores very well. Allow the chicken to cool completely, then transfer it to an airtight container and refrigerate for up to 3 days. Keeping the chicken submerged in the sauce helps prevent it from drying out and preserves that glossy, takeout-style texture. This makes it a great option for next-day lunches or an easy reheated dinner.
How to Make Sweet-and-Sour Chicken Ahead of Time
This recipe is ideal for partial make-ahead prep. You can prepare the sweet-and-sour sauce up to 2 days in advance and store it in the refrigerator. Vegetables can also be chopped ahead of time and kept in a sealed container. For best results, fry the chicken fresh when you’re ready to serve—this keeps the coating crisp and prevents sogginess once it’s tossed in the sauce.

How to Reheat Sweet-and-Sour Chicken
For the best texture, reheat sweet-and-sour chicken gently on the stovetop over medium-low heat. Add a small splash of water or pineapple juice to loosen the sauce and keep it glossy. Microwave reheating works in a pinch, but use short intervals and stir in between to avoid overheating the chicken. Proper reheating keeps this homemade sweet-and-sour chicken tasting just as comforting as the first night.
Final Thoughts
This homemade sweet-and-sour chicken is one of those dinners that proves you don’t need a takeout menu to get that familiar, comforting flavor you’re craving. It’s glossy, saucy, and satisfying in all the right ways—an easy sweet-and-sour chicken recipe that works for busy weeknights, casual family dinners, and those evenings when you just want something reliable and good.
Whether you’re chasing a takeout-style sweet-and-sour chicken experience, looking for an easy pineapple and chicken dinner, or easing your way into cooking Chinese-inspired dishes at home, this recipe earns its spot in the rotation. It’s flexible, forgiving, and designed for real life—even if your smallest critic decides fruit snacks are the hill they want to die on that night.
If you enjoyed this recipe, I’d love for you to subscribe to the blog. Subscribers get new recipes delivered straight to their inbox, along with practical kitchen tips, weeknight dinner inspiration, and comfort-food ideas you can actually use.
And if you’d like to support my kitchen and the work that goes into creating and testing these recipes, you can buy me a coffee. Every little bit helps keep these recipes coming—and keeps this space cozy, honest, and full of flavor.
Thanks for cooking with me.
— Camille

)
Sweet and Sour Chicken (Better Than Takeout, Made at Home)
4
servings25
minutes25
minutes50
minutesThis sweet and sour chicken is crispy, saucy, and perfectly balanced between tangy, sweet, and savory. We use juicy chicken thighs for this version, but boneless chicken breasts make prep even quicker for a weeknight win.
Keep the screen of your device on
Ingredients
- For the chicken
2 pounds boneless skinless chicken thighs
2 large eggs
1/2 cup cornstarch
1/2 cup all-purpose flour
Salt
Black pepper
Garlic powder
Vegetable or canola oil, for shallow frying
- For the sweet-and-sour sauce
1/2 cup pineapple juice
1 tablespoon soy sauce
2 tablespoons apple cider vinegar
3 tablespoons ketchup
2 tablespoons brown sugar
1 clove garlic, finely minced or grated
1/2 teaspoon red pepper flakes (optional)
1 tablespoon cornstarch
2 tablespoons water
- Vegetables and extras
1 red bell pepper, diced
1 green bell pepper, diced
1/2 yellow onion, sliced
1 cup pineapple chunks
Steamed white rice, for serving
Directions
- Cut the boneless skinless chicken thighs into bite-sized chunks. Season generously with salt, black pepper, and garlic powder.
- In one bowl, beat the eggs. In a second bowl, combine the flour and cornstarch.
- Dip each piece of chicken into the beaten eggs, then dredge in the flour-cornstarch mixture, pressing gently so the coating adheres.
- Heat about 1/4 inch of oil in a large skillet over medium-high heat. Working in batches, fry the chicken until golden brown and crispy on all sides. Transfer to a paper towel-lined plate.
- In a saucepan or clean skillet, whisk together the pineapple juice, soy sauce, apple cider vinegar, ketchup, brown sugar, garlic, and red pepper flakes. Bring to a gentle simmer.
- In a small bowl, mix the cornstarch and water to create a slurry. Whisk it into the sauce and cook for 2 to 3 minutes, until thick and glossy.
- Add the bell peppers, onion, and pineapple chunks to the sauce. Cook for 3 to 5 minutes, stirring occasionally, until the vegetables are just tender.
- Add the fried chicken to the sauce and toss to coat evenly. Let everything simmer together for 2 minutes so the flavors meld.
- Serve hot over steamed white rice.
Did you make this recipe?
Tag @camilles_comforting_cuisine on Instagram and hashtag it with
Like this recipe?
Follow camillescomfortingcuisine on Pinterest
Check Out My Latest Recipes
- How To Make a Perfect French-Canadian Meat Pie
 If you’ve ever wanted to master a classic French-Canadian meat pie recipe without all the fuss, this is it. This easy meat pie is rich, flavorful, and filled with seasoned pork and beef, mashed potatoes, and aromatic spices that make your home smell like pure comfort. You’ll learn exactly how to make an easy French-Canadian… Read more: How To Make a Perfect French-Canadian Meat Pie
 - The Best Homemade Beef and Broccoli Recipe for Easy Dinner
 This easy beef and broccoli recipe is the best homemade beef and broccoli you will ever try. Saucy, savory, and full of rich takeout-style flavor, this quick dinner is a dad-approved, kid-friendly dinner win every single time. We finally did it. We made the best beef and broccoli recipe to ever come out of my… Read more: The Best Homemade Beef and Broccoli Recipe for Easy Dinner
 - How to Make Sticky Brown Sugar Pineapple Glazed Chicken Wings
 These brown sugar pineapple glazed chicken wings are the perfect blend of sweet, savory, and sticky. Fried until crispy then tossed in a bold pineapple glaze made with soy sauce, mustard, and brown sugar, these wings are saucy, glossy, and guaranteed to be a crowd favorite. They’re easy to make, full of flavor, and ideal… Read more: How to Make Sticky Brown Sugar Pineapple Glazed Chicken Wings
 - Simple and Flavorful Pork Chops in Lemon-Caper Sauce
 This Lemon Caper and Pork Chops recipe is not from Pinterest boards or meal plans, but from standing in the kitchen staring at what’s left in the fridge. A few lemons rolling around on the counter. Half a jar of capers, and a pack of pork chops that needed love. That’s how this recipe was… Read more: Simple and Flavorful Pork Chops in Lemon-Caper Sauce
 - This Easy Roasted Red Pepper, Baked Feta, and Chickpeas Is Impressive
 Sometimes you need something that feels indulgent but doesn’t chain you to the kitchen for hours. Something you can scoop with warm pita, snack on while cleaning the house, or put down in the center of a party table and watch disappear. This baked feta and chickpeas recipe is creamy, filling, and loaded with flavor… Read more: This Easy Roasted Red Pepper, Baked Feta, and Chickpeas Is Impressive
 - Easy Asian Glazed Pork Chops That Your Family Will Love (And Ask For More)
 I didn’t know I needed this meal until I made it. But let me tell you—these Asian glazed pork chops hit the spot so perfectly, I knew by the second bite they were going on the blog. There’s something special about this recipe. Maybe it’s how effortless it feels, even after a long workday. Maybe… Read more: Easy Asian Glazed Pork Chops That Your Family Will Love (And Ask For More)